
Detail Info for: Ford : Focus ZTS Sedan Clean 2001 Ford Focus ZTS 5-spd "toad" with Brake Buddy to tow behind an RV

Transaction Info
Sold On:
01/31/2012
Price:
$ 2995.00
Condition:
Mileage:
92356
Location:
Metro West Boston, MA, 01432
Seller Type:
Private seller
Vehicle Specification
Year Make Model:
2001 Ford Focus
Submodel Body Type:
ZTS Sedan Sedan
Engine:
4 - Cyl.
Transmission:
Manual
VIN:
1FAHP38311W381330
Vehicle Title:
Drive Train:
Fuel Type:
Gasoline
Standard Equipment:
Optional Equipment:
Vehicle Detail
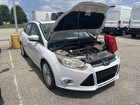
Welcome to our auction! You're bidding on a very clean 2001 Ford Focus ZTS Sedan Equipped With Towbar And Auxiliary Brake System For Towing Behind A Recreational Vehicle. In the notes below, click on the thumbnail for a more detailed picture. Click on the "(Full Size)" link for the large size file, not quite straight from the camera. Our new camera takes 12mp files, so we have changed our standards a bit. Unless otherwise stated, "Large" files are limited to 4mb, "Medium" (less detailed) files are limited to 50kb, and "Small" (thumbnail) files are limited to 3mb. We host our own pictures and test our auction listings using Firefox, latest version. For your safety, our auction listings contain no active content. This vehicle is used most days for local errands, and the mileage at the time you take possession will be slightly higher than in the pictures. On 10/25/2011 the mileage was about 92,050 miles when we gave it to the Ford dealer for the annual state required safety inspection. On December 27, 2011 (when we created this listing) the mileage was 92,536. Since it is used so often, there is no "storage stink" or lack of maintenance for tires, lubrication, etc. We have allergies, so we don't smoke or have pets or allow either in the car. We have quite a few pictures in our auction, but we've tried to organize them for your personal tour. There's a lot to see - we hope you enjoy looking at what follows. This car is special in that it can be pulled behind a truck or RV safely, and so our auction emphasizes the towing aspects more heavily than other features. "Camping World" is a good source of information about equipment used to tow a car, and "Good Sam Club" (and others) have forums about "dinghy towing" equipment with user comments. In 2001 the ZTS was the "top of the line" for the Ford Focus. It offered four options: Side Air Bags (this car has them); leather seating surfaces (this car has them); automatic transmission (this car has a manual five speed transmission); traction control (this car does not have this feature). Safely towing a car behind an RV "four down" (or rolling on the ground) calls for disengaging the cars drive train (put it in neutral), unlock the steering (first click of the key), use a frame mounted tow bar system (this car is so equipped), make sure siganl lights are present (magnetic lights go on the roof), and have a braking assist system with break-away switch (this car has a Brake Buddy). You can get to the various areas of our auction pictures either by scrolling, or by the following shortcuts: Outside Appearances. General outside pictures. Mounting the brackets. We generally store the brackets and bar on the vehicle, but here's how the brackets are mounted. Mounting the bar. This will give you a general idea of how the tow bar mounts to the brackets. Extending for hookup. Extending the towbar to the towing position, and details on how it folds. Mounted towbar storage. This is how the towbar is covered if you choose to leave it mounted all the time. Brake Buddy braking system. Here's the Brake Buddy braking system which applies the brakes in the car when you slow down, or when the breakaway switch is activated. Tour of the passenger compartment. Thanks to the leather interior, this little car is very comfortable, easy to keep clean and handles wear very well. Other interior details. Here are some other notes about other interior features. Things to know about. There are disclosures that we want to make, and the details are here. Other notes and comments. Some of the things we wanted to say just didn't fit into other categories, so we lumped them all here. Mid-auction pictures. If there are any questions that a picture would clarify, we'll post them here. We've left room for eight such pictures. If you see something other than "Picture Not Available", check it out. Outside Appearances. See anything unusual here? Besides the cardboard over the license plate I mean? We didn't want to show off our license plates, so we clipped some cardboard over them for photo purposes. (Full Size) Looks like an ordinary little Ford Focus, right? Granted, ZTS models aren't very common for the 2001 model year. (Full Size) Looking down the left side of the car from the rear - nice and straight - nothing unusual here. (Full Size) Looking down the right side of the car from the rear - nice and straight - nothing unusual here either. (Full Size) Here's the left side again, from the front. Nothing unusual. (Full Size) Here's the right side again, from the front. Still nothing unusual. (Full Size) Here's the left side from a distance - still don't see what the fuss is about. Wait - what's that black thing on the front? (Full Size) Here's the right side from a distance. Still can't make out what the thing on the front is. (Full Size) Mounting the brackets. When the brackets and tow bar are off the vehicle, there is very little evidence of how the car is towed. We generally keep the brackets and tow bar mounted so we don't have to store them inside. (Full Size) Here's a close-up of one of the bracket mounts. The funny looking metal to the center of the car is part of a locking mechanism that secures the bracket to the mount. (Full Size) This is the bracket for the right or passenger side of the car. In RV lingo this is usually referred to as the curb side. Street side and curb side make more sense when you're moving around inside an RV - it doesn't matter which way you're facing. (Full Size) This is the left or street side bracket. You can see the little projection on the bracket (look at the shadow) that engages in the mount. There's also a cam (at the bracket end) that engages in the mount. (Full Size) The bracket has been inserted, the cam end was rotated to engage in the mount, and the locking mechanism is now engaged. The wires are for the auxilary magnetic brake lights that plug into the towing vehicle. (Full Size) The street side bracket is now mounted and locked as well. The brackets cannot be mounted on the wrong side, but they're labeled anyway. The wire cable is for the breakaway switch, which activates the vehicle brakes if the car uncouples while towing. (Full Size) The safety cable attaches to the bracket and the towing vehicle, and is there in case the towing coupler, hitch or towing ball fails. It's easier to attach this cable before the tow bar is put into position. (Full Size) If everything is adjusted correctly and the hitch fails, the car is kept at the rear of the RV by the cables, and it will either hit the RV bumper (going downhill) or trip the breakaway switch (going uphill). It might be messy, but it should minimize any injuries to others. (Full Size) Mounting the bar Recall that we have a harness for the auxilary brake lights, and a cable for the breakway switch. Here's what they look like with the brackets removed (for clarity). (Full Size) I prefer to route the safety cables through the tow bar before mounting the bar - it just seems a little easier to manipulate to me, and it is easier to get to the cable holes on the bottom of the brackets too. (Full Size) The bar assembly lowers over the brackets, with both the pin on the bracket (pointing up) and the pin on the bar (pointing down) going through their respective holes. The bracket pin points up in this picture. (Full Size) This is the left side of the bar assembly, and you can see the bracket pin pointing up here as well. (Full Size) The lock pin is installed next. When we are actively moving we use the lock pins, but when we park or are not hitched to a tow vehicle we use padlocks to keep the bar and brackets from {ahem} wandering away. (Full Size) Here is the left lock pin. The square holes outboard of the pins are receivers for an optional shield to protect the car from stones and road debris. We always used a shield on the RV, and do not have a bar shield. An RV supply store can order a shield for you if you want. (Full Size) Extending for hookup Tow bar in the installed and stowed position. The coupler socket is to the street side, and there is a small guide close to the socket to keep the safety cables, wiring harness and breakaway cable off the ground. When you hitch up, connect the safety cables crossed (to form an X) so they let you take tight corners. (Full Size) In this closeup you can see a vertical pin that engages a retainer on the bar. This pin keeps the stowed tow bar from flopping around and causing problems (big problems). (Full Size) You begin the extension process by lifting the coupler socket up. The left leg joint then begins to slide from the right side of the bracket to the left. Each leg also extends for towing, and collapses for storage. (Full Size) When the left leg joint slides ALL the way left, and only then, it becomes possible to lower the bar forward. Lowering the bar forward locks the left leg joint in the far left towing position. (Full Size) The left leg is now locked in the fully extended position, and the tow bar is ready to be lowered forward and connected to the towing vehicle. Some people prefer to leave the legs contracted until hitched. (Full Size) Ready to hook up. The whole assembly now forms a rigid triangle, and cables and wiring may be safely routed and secured to prevent pinching or dragging while underway. (Full Size) Mounted towbar storage This is what it looks like with the towbar secured and covered. People who don't look where they are going and walk too close to the front end will appreciate the cover. This is not a soft front bumper! (Full Size) Start with the towbar in the collapsed position, and have padlocks handy. We use a set of bicycle locks - one for the socket and two for the vertical pins. Make sure the coupler end engages the storage pin so the towbar doesn't flop around. (Full Size) Wrap the safety cables around the assembly tightly, and padlock each cable to the opposite side mounting bracket pins. A tight wrap makes removal at the bracket end of the cable very difficult if not impossible. (Full Size) Make sure the bracket padlock engages the end of the safety cable. Tension and placement of the breakaway cable and magnetic brake light wiring haress is not critical - just make sure they don't dangle. (Full Size) The round black object at the passenger side end is the connector for the magnetic brake lights. All the cables are wrapped nice and tight, and secured by padlocks. Theft of the parts or malicious towing is much more difficult now. (Full Size) Now add the cover - made of heavy material - and you're done. The assembly doesn't look too bad, and it is protected from the elements and (hopefully) unauthorized removal or tampering. (Full Size) Brake Buddy braking system The Brake Buddy system applies the brakes in the car whenever the tow car slows, or if the breakaway switch is tripped (which means the hitch system has failed). This kind of a system is required in most states when towing a vehicle (or trailer). (Full Size) Here is the transmitter and receiver that tells you (in the cab) whenever the brakes have been applied in the car. You can use this to help calibrate the system to your needs, and to make sure brakes are being applied when they should. (Full Size) The system has a lot of adjustments to adapt to many cars. Once set up for a particular car, further adjustments are not often required. It is currently set up to brake evenly with the tow vehicle, and is capable of locking the car brakes in an extreme panic stop. (Full Size) This receiver plugs into a power outlet in the tow vehicle, and lights up whenever the car brakes are activated. You can't see how hard the car brakes are applied, but you can tell when the Brake Buddy applies the car brakes. (Full Size) Operation instructions are on the Brake Buddy itself - no papers to lose! You can adjust the sensitivity (how much deceleration force before assisting), "enthusiasm" or how much braking force is applied, and a maximum of braking force permitted. (Full Size) Here's another side view. Notice the extended bracket along the top right. When the unit "presses" the brake pedal, this racket tends to force the controller down into the floor so it won't "jump up" when operating. (Full Size) That extended bracket sits against the top front edge of the driver's seat. The bracket also prevents damage to the seat height adjustment crank and seat forward/backward release lever (bottom right). (Full Size) The Brake Buddy clamps to the foot brake pedal, and plugs in to a power point. It uses an air compressor to apply the brakes, and while it might look a bit intimidating at first, is a very easy system to use and very reliable as well. (Full Size) The breakaway switch is under the hood, and the wires are routed along the outside of the car. This way there are no holes in the firewall to leak water or fumes, and the wires are much easier to get at if necessary. (Full Size) The brake light wires are also routed along the outside of the car. Again, there are no holes in the firewall to leak water or fumes. (Full Size) The wires just jam into the seam between the door post trim and the dashboard. They stay put, yet can be easily pulled out to connect to the Brake Buddy control unit. (Full Size) The brake light wires go up and over the passenger sun visor, and along the passenger assist handles. The magnetic brake lights are actually stowed in the map pocket on the back of the passenger seat. (Full Size) Tour of the passenger compartment This is the view of the left front door. There is a piece of plastic trim missing - look at the right front door picture to see how it should be. The pins broke off of the trim - the new owner could probably glue it back on. (Full Size) This is a picture of the right front door. Just over the armrest you can see the piece of trim that is missing on the left front door. (Full Size) The plastic trim comes with the car. It attached with small pins molded to the back, and it might be possible to glue the trim piece back on. (Full Size) Here you can see more clearly what the trim piece looks like. This is the passenger door, but it looked just like that on the driver's side until it popped off. (Full Size) There is of course some wear on the seats, but the leather has stood up very well. We never smoked in the car and don't own pets, so it is clean and odor free. Notice that the weatherstrip is starting to tear and will need repairs soon. (Full Size) The passenger seat is also clean and has no holes. Notice the center armrest - it is in the down position but opened up. We keep gloves and a notepad here. The roll of quarters (for tolls) is in the ashtray. (Full Size) The passenger seat slides front to rear, and the seat back angle adjusts. The driver seat also adjusts up and down, and has a lumbar adjustment. (Full Size) The glove box is a decent size, and both front riders have a cup holder. (Full Size) This shows the headliner in front - no tears and clear. The wiring harness is for the magnetic brake lights. The courtesy light is by the mirror, and can be on, off, or operated by any door. (Full Size) Here's the other side of the headliner, also clean and without tears. Also notice that each door has an overhead entry assist handle. (Full Size) This is the left rear door. The driver can lock out the power windows so they can't be operated by others. And the rear doors have child safety locks on them - they can be set to only operate from the outside. (Full Size) And this is the right rear door. You may notice some rust along the bottom edge - more about that later. (Full Size) The back seat is in excellent condition - our kids are grown up with families of their own. That is a pocket on the back of the driver's seat, and the brown oval signifies Side Impact Air Bags (front seats only). (Full Size) This is the right rear seat area. We keep the magnetic brake lights in the pocket on the back of the front passenger seat. They can be easily pulled out and mounted on the roof when needed. There's one cupholder in the rear. (Full Size) The back seat is one piece and is easily removed for cleaning under it. I guess you could leave it out for hauling, but we've never had to do that. The rear seats fold down fairly flat for long loads. (Full Size) Again, the rear seats are in excellent condition, and there are seat and shoulder belts for three in the rear. To be such a small car, it has a great deal of room in the seats and a huge trunk as well. (Full Size) The rear headliner is clean and has no tears. The little piece of plastic inside the rear passenger assist handle is a small coat hook. We used it to mount a full width clothing hanger bar. When we used this for camping, it was our closet. (Full Size) The other side of the headliner. Here's a tip: to keep the clothes hanger bar from jumping off the hooks, wedge a small pill bottle on top of it. It doesn't hurt the headliner, and keeps the bar down on the hooks. (Full Size) This armrest is shared by the driver and front passenger. This picture shows the top closed and the armrest in the down position. (Full Size) Here the armrest has been folded up and back. This gives you a bit more elbow room if you're feeling crowded. (Full Size) And finally, the trunk is pretty generous. There is a cargo net organizer included in the auction - the mesh looking thing in this picture. The white object hanging from the trunk lid is a glow-in-the-dark emergency truck lid release handle. (Full Size) The rear seats are split (60 - 40?) and fold down to handle large or long loads. The seat release knobs are in the upper corners of the trunk opening, and operation is quite simple. Fold the front seat too and some really long loads will fit. (Full Size) Other interior details This is the VIN - sorry for the quality. We just washed the car, and the blobs are water spots. Since we're the original owners, we never needed to check it with CarFax, but feel free. (Full Size) The ZTS model is pretty zippy, and was factory equipped with P205/50 R16 tires. The data plate says 34 pounds of pressure, but we generally keep it at 36 pounds. Snow chains have never been necessary - it handles snow well. (Full Size) The driver side sun visor has a flip up make-up mirror that lights up. (Full Size) The passenger side sun visor also has a flip up illuminated make-up mirror. (Full Size) There is a remote trunk release on the dash. The wires in the picture are for the breakaway switch, and connect to the Brake Buddy when the car is being towed. (Full Size) The steering wheel tilts and telescopes - unusual for a small car (and discontinued in later years). Flip the clamp down, adjust the steering wheel to suit, and flip the clamp up to lock in that position. (Full Size) The instrument panel is clean and easy to read. If you're an enthusiastic driver, notice that the "engine happy" range of 4 to 6 thousand RPM is in the sweet spot for your peripheral vision. (Full Size) The odometer read 91884 on that date, and 92073 on November 11 when we last refueled. We use the car every day, and have gas purchases recorded in a spread sheet. We have bought 3122 gallons of gas for a lifetime average of 29.47 MPG. (Full Size) This is the gearshift for the 5 speed standard transmission. There is a lock-out to prevent accidently shifting into reverse. The shift is pretty smooth and precise - it is a fun little car to drive. (Full Size) Here's the dash - simple and functional. You can just see the tip of the wheel mounted windshield wiper control at the upper left. The ashtray is located above the cigarette letter. We keep change in it for tolls and such. (Full Size) The radio that came with the car is included in the auction - it has been out of the car since almost new and untested. The radio we put in is a Clarion and is a single CD (MP3 capable) AM / FM. The original radio could not play MP3 CD media. (Full Size) The front face of the radio pivots down for access to the CD loading slot. (Full Size) Here you can see the CD loading slot and CD eject button (upper right). When the front face is closed, this unit doesn't look like anything more than a simple AM / FM at first glance. (Full Size) And if you wish, the front face is removable. When the face is removed all the controls are inoperative. There is a "carry box" for the face that is included in the auction. (Full Size) Things to know about [1] We were brushing a pretty good load of snow off the roof last year, and the radio antenna didn't see the snow brush coming. It's an easy fix - there is a little double ended rod about 2 inches long, and that's what broke. We'll either have it repaired by delivery time, or we'll make an allowance for a new piece. (Full Size) [2] Somewhere along the way a trim piece was misplaced that covers the center of the cast aluminum wheel. It is cosmetic only and will look like this at the time of delivery. (Full Size) [3] The wheel currently mounted on the right rear had an encounter with a world famous Massachusetts pothole, and survived it but suffered a crack. We pump the tire up to about 38 PSI, and a week or so later it is down to 22 PSI or so. Nobody has been able to completely repair it, so I carry an air pump in the trunk. The best possible solution to this problem and the missing trim piece (above) is finding replacement parts at a junk yard. This will not be repaired at the time of delivery. The air pump is not included in the auction. (Full Size) [4-7] You may have noticed some rust damage on the door edges in the pictures above. Here (and below) are close up pictures of all four doors. There are also some rust spots beginning to form along the edges of the trunk lid. This is the Left Front (driver) door. (Full Size) [4-7] This is the Right Front door. (Full Size) [4-7] This is the Left Rear door. (Full Size) [4-7] And this is the Right Rear door. None of these rust areas will be fixed before delivery. (Full Size) [8] The cancel feature of the turn signal does not work. You can signal a turn, but after you complete the turn you must manually turn the turn siganls off (return the lever to the center position). This will not be repaired before delivery. (Full Size) [9] The hood release handle (at the bottom edge of the dash) has broken away from the bracket and hangs loose now. We sort of tuck it over to the left side pillar and it stays out of the way. This will not be repaired before delivery. (Full Size) Other notes and comments By now you've surely asked yourself why, if this is such a great car, are we selling it. Good question. We'll be retiring within the next few years, and will become full-time campers. This is a fabulous car to pull behind a camper, especially if camping for weeks at a time, but it won't be right for full time life on the road. We hope to buy a truck and full-size trailer for our retirement adventure, and would need to sell the car anyway. We live in a condo, and cannot keep all the toys we want here. This is a used vehicle, and is being sold as-is and with no warranty by an individual seller. (Full Size) We have a clear title for this vehicle, and will make arrangements to meet at a bank to sign the papers and transfer funds. It passed the annual Massachusetts Inspection in October, and is ready for you to drive away. We expect the winning bidder to pay a down payment of $500 within 48 hours of the close of the auction. This must be made by wire transfer to our local bank account, or by PayPal, or cash. Final payment is expected to be in a form that a bank will accept immediately with no recourse. For example, wire transfers, travelers checks or cash would be acceptable forms; money orders or other instruments that are not immediately viable are not acceptable. THIS IS THE BUYER'S RESPONSIBILITY - unacceptable forms of payment will delay the transfer of the title to you. (Full Size) We want this transaction to be concluded as safely and securely as possible for both parties. We will help the buyer make arrangements to conclude the sale at a bank, so we may transfer title and funds and deliver the vehicle in a safe manner. We expect full payment and title transfer to be complete within ten days after the auction ends. We can help an out-of-town buyer make connection travel arrangements from an airport, bus or train station, and suggest overnight motel possibilities as well. (Full Size) We live in the "MetroWest" area of Boston, and that's where the vehicle is located. The buyer is responsible for all matters concerning registration, insurance, sales taxes and other paperwork. If you need temporary plates to drive it home, you should bring them with you. If you need to arrange delivery we'll try to help with that. The owner's manual for the car and stereo are included, but we'll teach you the important tricks as part of the delivery: how to open the hood, how to get into reverse, and how to unfold the tow bar. (Full Size) Customers with zero or negative feedback on eBay Motors, please contact us prior to bidding. Otherwise, we reserve the right to cancel your bid. This is only to protect the integrity of the auction. The winning bidder MUST contact the seller and make a down payment of $500 within 48 hours of the auction close. The purchase transaction must be completed within ten days of the auction close. We reserve the right to re-list or sell the vehicle in the event of a non-paying winner, and your deposit will be forfeit.. (Full Size) We are a private party, not a dealer. We've gone to a great deal of effort to describe this vehicle as accurately as possible. You are welcome to bid, but be prepared to win first! This means get your finances in order, obtain full agreement with any other significant parties, read all descriptions, do all the research, and ask all your questions BEFORE you bid. Then, when you bid, bid responsibly! Good luck, and thanks for looking at our auction. (Full Size) Mid-auction pictures Mid-auction picture 1. (Full Size) Mid-auction picture 2. (Full Size) Mid-auction picture 3. (Full Size) Mid-auction picture 4. (Full Size) Mid-auction picture 5. (Full Size) Mid-auction picture 6. (Full Size) Mid-auction picture 7. (Full Size) Mid-auction picture 8. (Full Size) About our auctions: We try to describe our auction items as accurately as possible. The "Full Size" pictures help you examine things "up close". Please make sure to give us your mailing address, and telephone number or email address with your down payment. We will contact you to verify your information, and to make further arrangements. We do not sell or divulge your information, and unless you ask otherwise, we will discard your information about 90 days after we have concluded the sale. Thank you for looking at our auction!
Featured Items


2016 Ford Focus RS/AWD/SELECT DRIVE MODES/ FORD HIGH PERFORMANCE COLD AIR INTAKE
$19,995.00
Watches: 14
